
Yes, you can work on an existing Clipchamp project on another computer. The best way to do this depends on the version of Clipchamp you're using.
In Clipchamp for personal accounts, there are two options.
Option 1. Enable content backup
Enable content backup (a feature available on the Premium plan).
Once your files are uploaded to content backup, you'll be able to access and edit your video from any computer when you log in there with the same Clipchamp account.
Option 2. Manually bring your media files
Manually bring your video, audio, and image files that you used in your editing project to the new computer, log into the same Clipchamp account, and relink the media files to your project.
Why is this necessary?
By default, Clipchamp works with your media assets locally on your computer rather than uploading them to an online server.
As you make edits in a project, media files are stored temporarily in the browser cache and in a temp folder. This means that the files need to be available locally and if they're not, Clipchamp will show a message asking you to relocate them.
However, if you've only used stock video and audio from our library, then you don't need to bring files with you or use content backup and can continue working on a new computer straight away by signing in with the same Clipchamp login.
-
To learn how to use content backup, see this help article.
-
To learn how to bring your files with you and relink them, please see below.
How to manually bring your media files to a new computer
-
Save the files that you used in the video to a USB stick or online storage drive (such as OneDrive) so that you can move them to the new computer.
-
Load the files onto the new computer (for example, drag them to the desktop or download them to the Downloads folder).
-
Open Edge or Chrome and log in to OneDrive/SharePoint with the same account you used when creating your video.
-
Open your video editing project.
-
You will see a message prompting you to relink your files. Select it, then select Relink entire folder, find the folder with your media files on the new computer and select Upload.
Alternatively, select each file and locate and upload them one by one until all files are relinked.
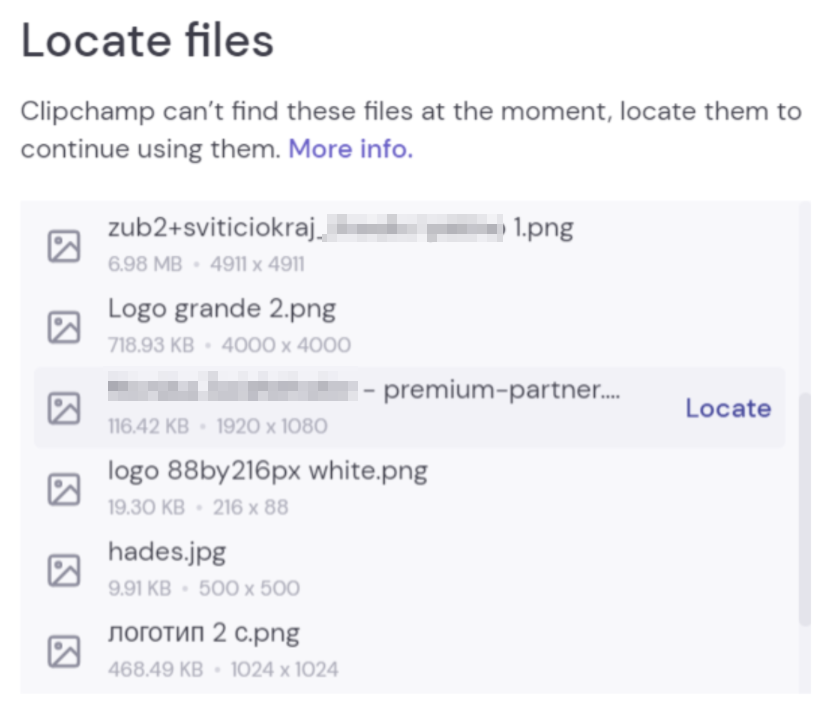
After all the files are relinked, the window will close, and you should be able to continue editing your video on the new computer.
In Clipchamp for work accounts, there are two options.
Option 1. Sign into OneDrive, then open the .clipchamp file
As you work on an editing project, the media files that are in use are automatically uploaded to the project's Assets folder in the Clipchamp project's main folder in your OneDrive/SharePoint. Because they are backed up this way, they will be available on another computer when you open the project there.
To do so, sign into your work OneDrive or SharePoint in Edge or Chrome on the new computer, navigate to the project folder and open the project's .clipchamp file. The project will open in a new browser tab and all media assets will get loaded in.
If the media files were moved from the Assets folder and therefore can't get loaded, you’ll be prompted to locate them.
Option 2. Manually bring your media files
Manually bring your video, audio, and image files that you used in your project to the new computer, then log into your Microsoft 365 work account, open the project's .clipchamp file in OneDrive/SharePoint in Edge or Chrome and relink the media files when you're prompted for them.
This option is useful if you know that the media assets are not in the Assets folder of the project in OneDrive and therefore, option 1 would fail to locate the files after opening Clipchamp.
When you copy the media files from an external source to the computer where you intend to open the Clipchamp project, you'll get asked to relink the files after opening the project. When you do and they get loaded in, they will also get uploaded into the Assets folder (again) on OneDrive behind the scenes.
Why is this necessary?
By default, Clipchamp works with your media files locally on your computer rather than uploading them to an online server for processing.
As you make edits in a project, media files are stored temporarily in the browser cache. This means that the files need to be available locally and if they're not, Clipchamp will show a message asking you to locate them.
Note that if you've only used stock video, images and audio from our library then you don't need to bring files with you and can continue working on a new computer right away by signing in with the same Microsoft 365 work sign-in.
How to manually bring your media files to a new computer
-
Save the files that you used in the video to a USB stick or online storage drive (such as OneDrive) so that you can move them to the new computer.
-
Load the files onto the new computer (for example, drag them to the desktop or download them to the Downloads folder).
-
Open Edge or Chrome and log in to OneDrive/SharePoint with the same account you used when creating your video.
-
Open your video editing project.
-
You will see a message prompting you to relink your files. Select it, then select Relink entire folder, find the folder with your media files on the new computer and select Upload.
Alternatively, select each file and locate and upload them one by one until all files are relinked. After all the files are relinked, the window will close, and you should be able to continue editing your video on the new computer.


