
In Clipchamp, you can either record your screen or you can record both your screen and webcam together to produce training videos, react videos, presentations, gaming streams, and much more.
When you record screen and camera together, the recordings are captured simultaneously but they can be adjusted in the editing timeline separately. This means each video can be resized and placed however you like.
For the ideal outcome, recordings will align if you place them on top of each other on the timeline. The webcam recording can then be altered using freehand editing to place it over the screen recording to give a picture-in-picture appearance.
How to screen record in Clipchamp
Step 1. Locate the screen recorder
In Clipchamp for personal accounts, to take a recording, go to the record & createtab on the toolbar.
Next, click on the screen tool or screen & camera tool. Audio will also get recorded through your computer's microphone, for example, if you want to talk while showing your screen (unless you turn audio recording off).
Note: The screenshots in this article show the screen recorder option. The same steps apply to screen & camera after choosing this option in the initial step.

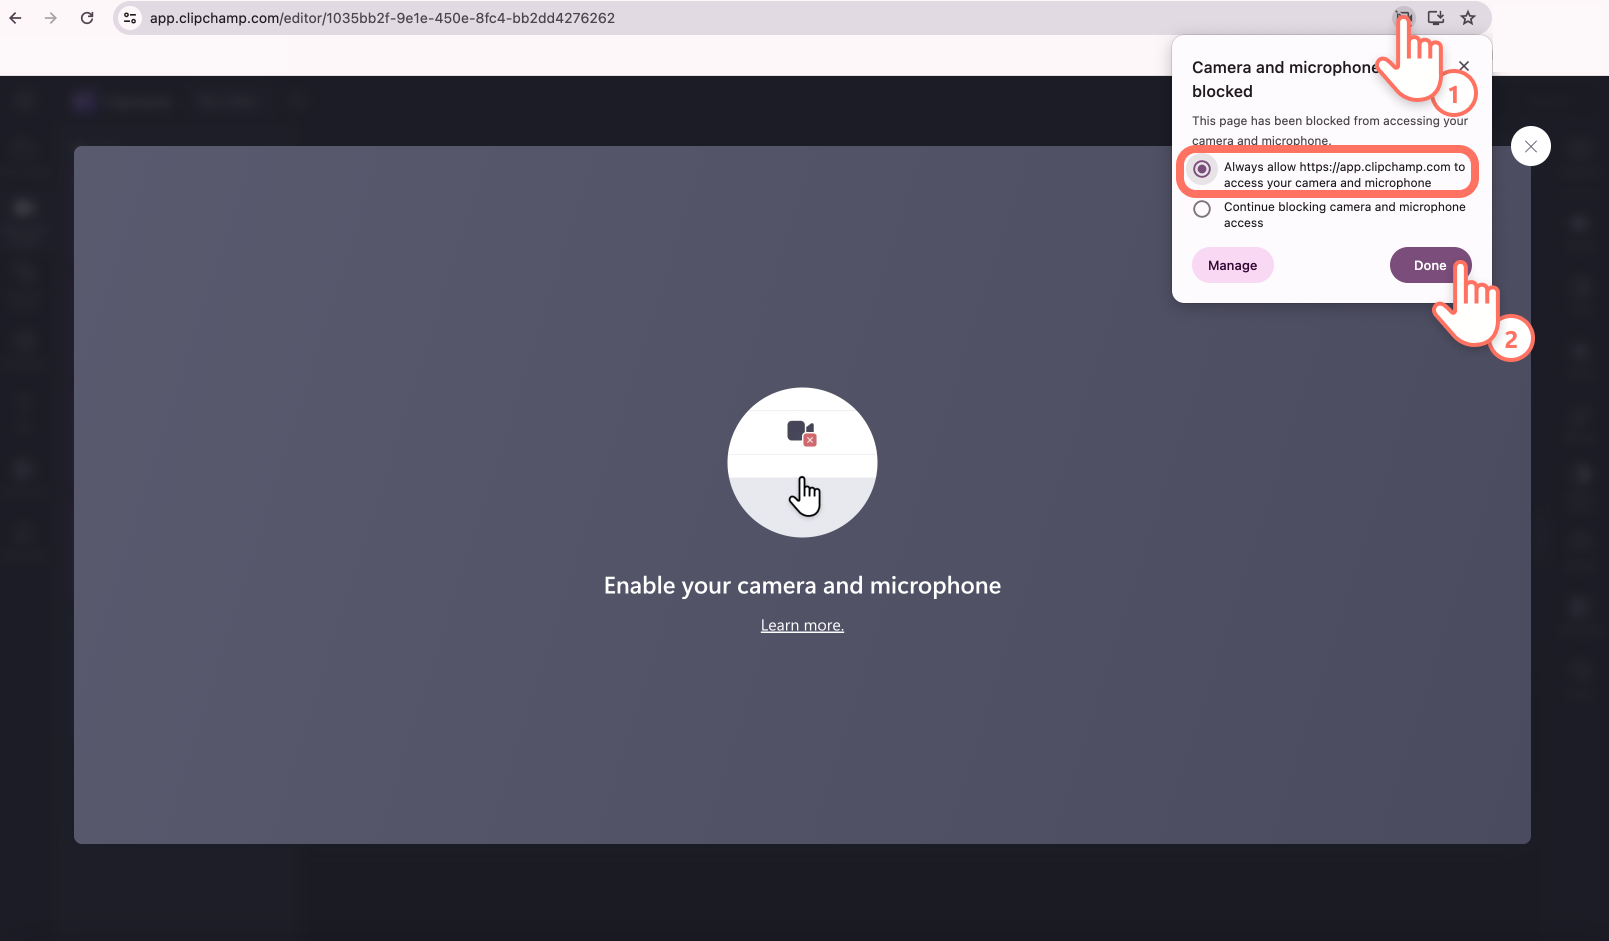
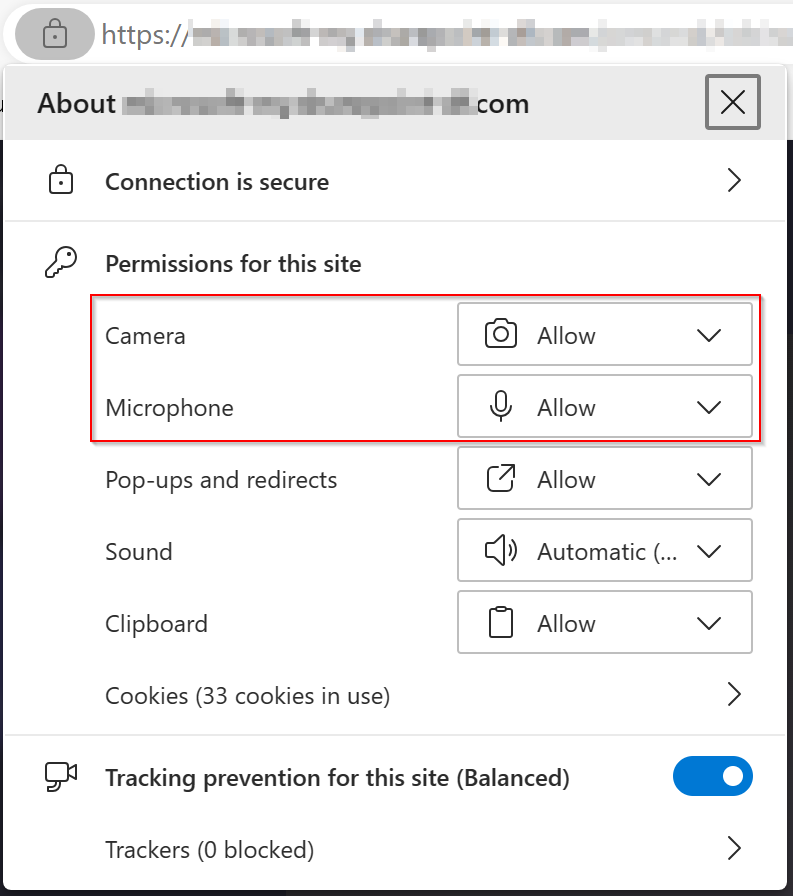
Step 2. Allow camera and mic access
A popup will appear at the top of your screen if you have never used the screen recorder before. Allow Clipchamp access to use your camera and microphone.
If you gave permission to access one or both devices before, the message on the popup can look different to our example screenshot.
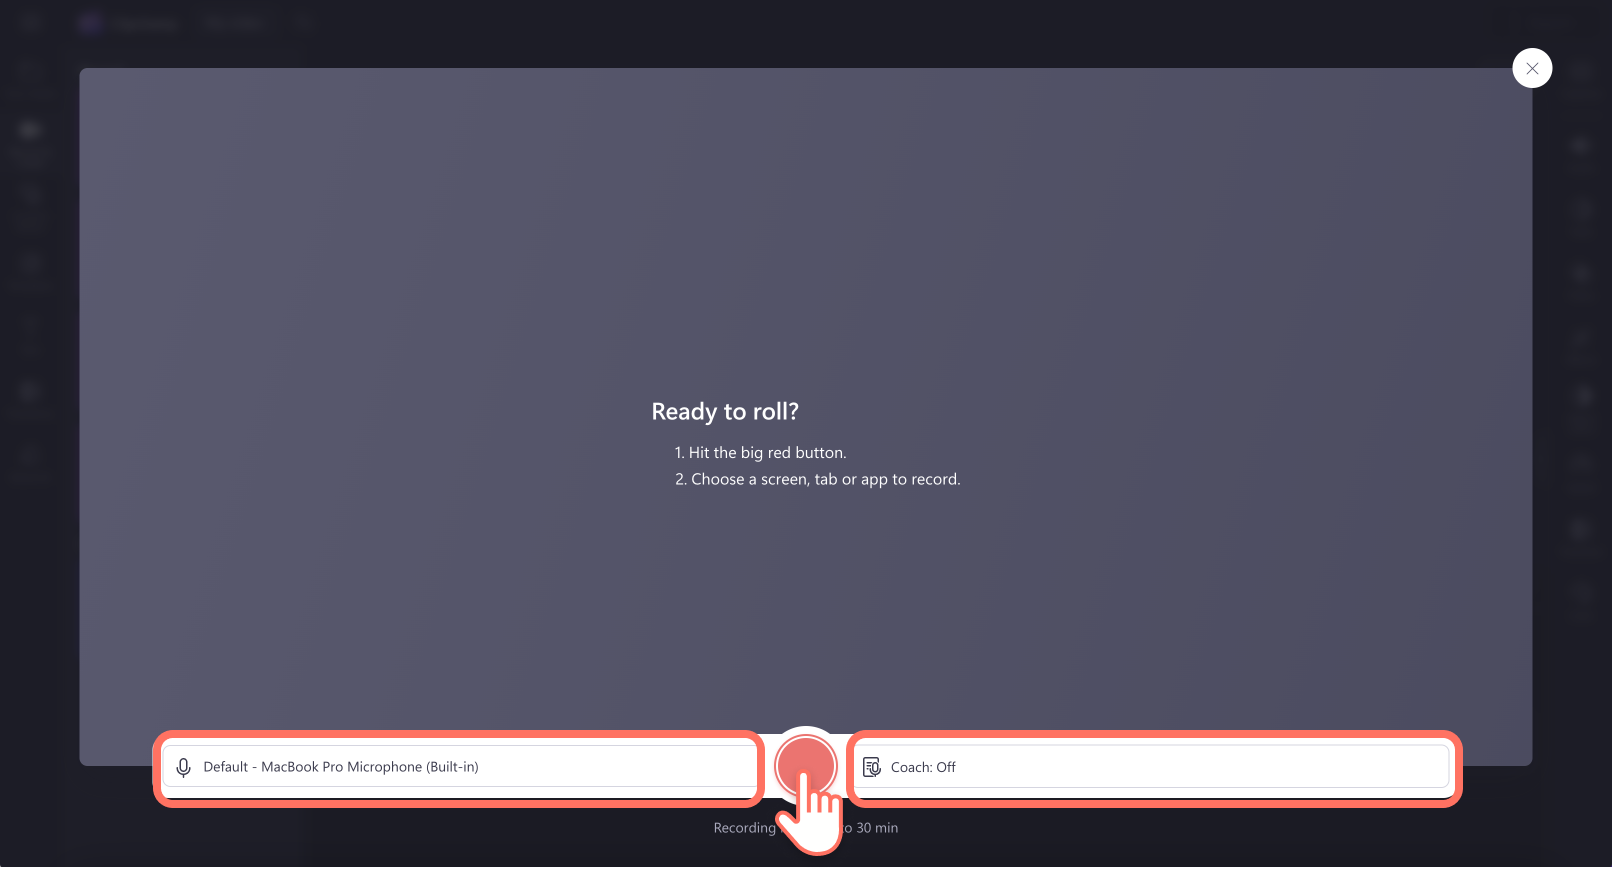
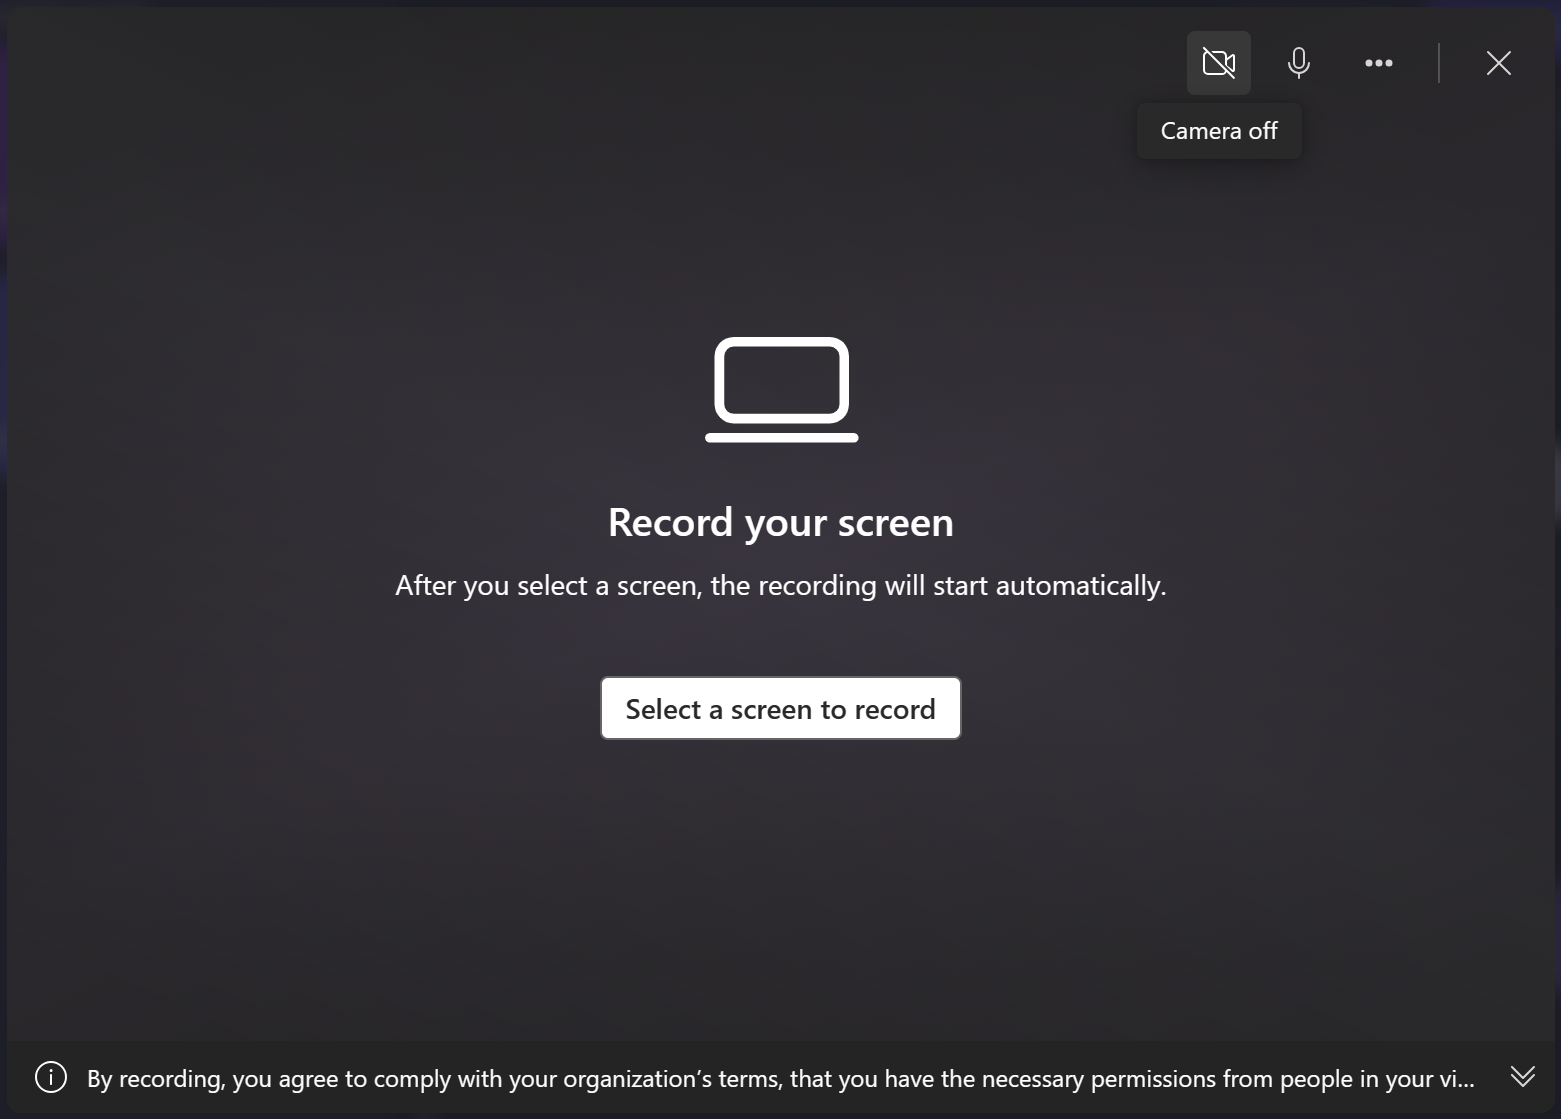
Step 3. Record your screen
Before recording, select your microphone source and turn on or off speaker coach. Next, click on the red button to start screen recording.
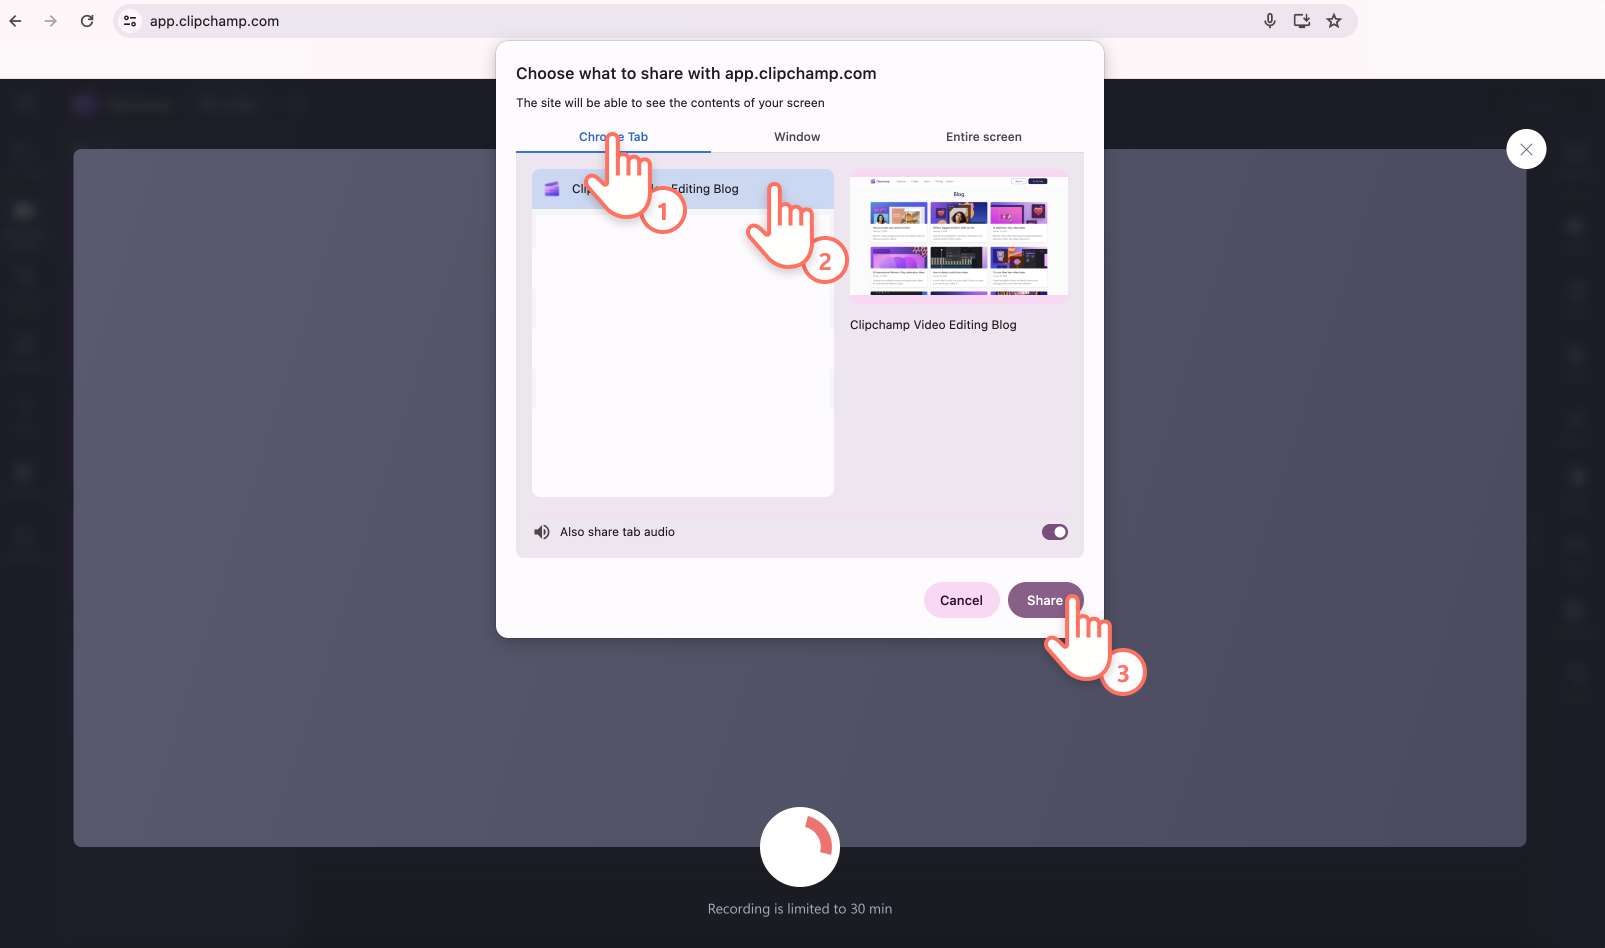
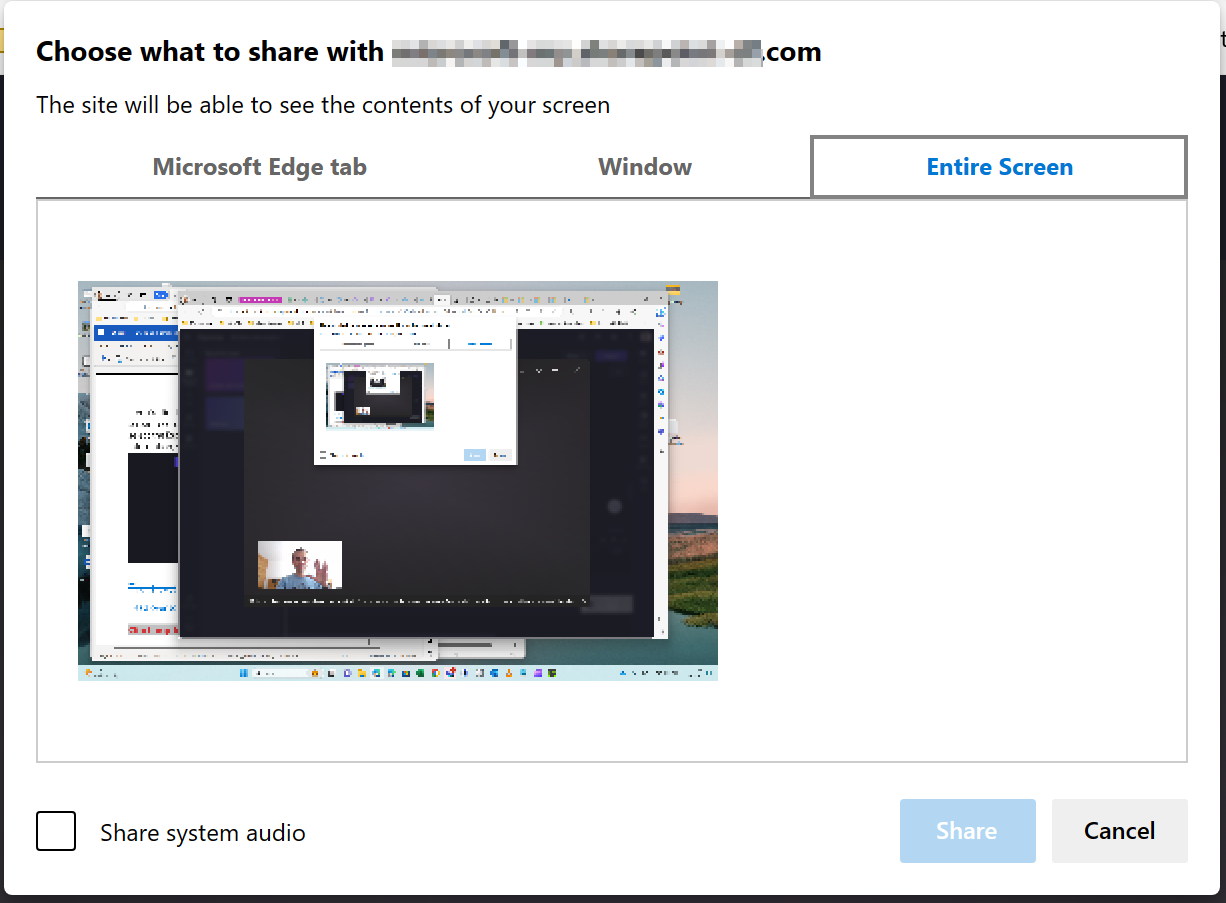
A smaller popup window will appear with screen recording options. Select to record your browser tab, window, or entire screen. If you would like to use audio, select browser tab only. Make sure to turn on the audio sharing toggle to allow audio access. Once selected, click on the share button.
Note: Audio recording only works with screen recording a browser tab.
Important: In the Clipchamp Windows app, you will be able to select browser tabs from Microsoft Edge due to the way the Windows app works. To record a Chrome tab, open Clipchamp in Chrome and start a screen recording there.
You will be brought to the Chrome tab you have selected to screen record. Your screen is now actively recording. Your built-in microphone will also pick up on your voice, computer or mouse clicking, and any noise around you.
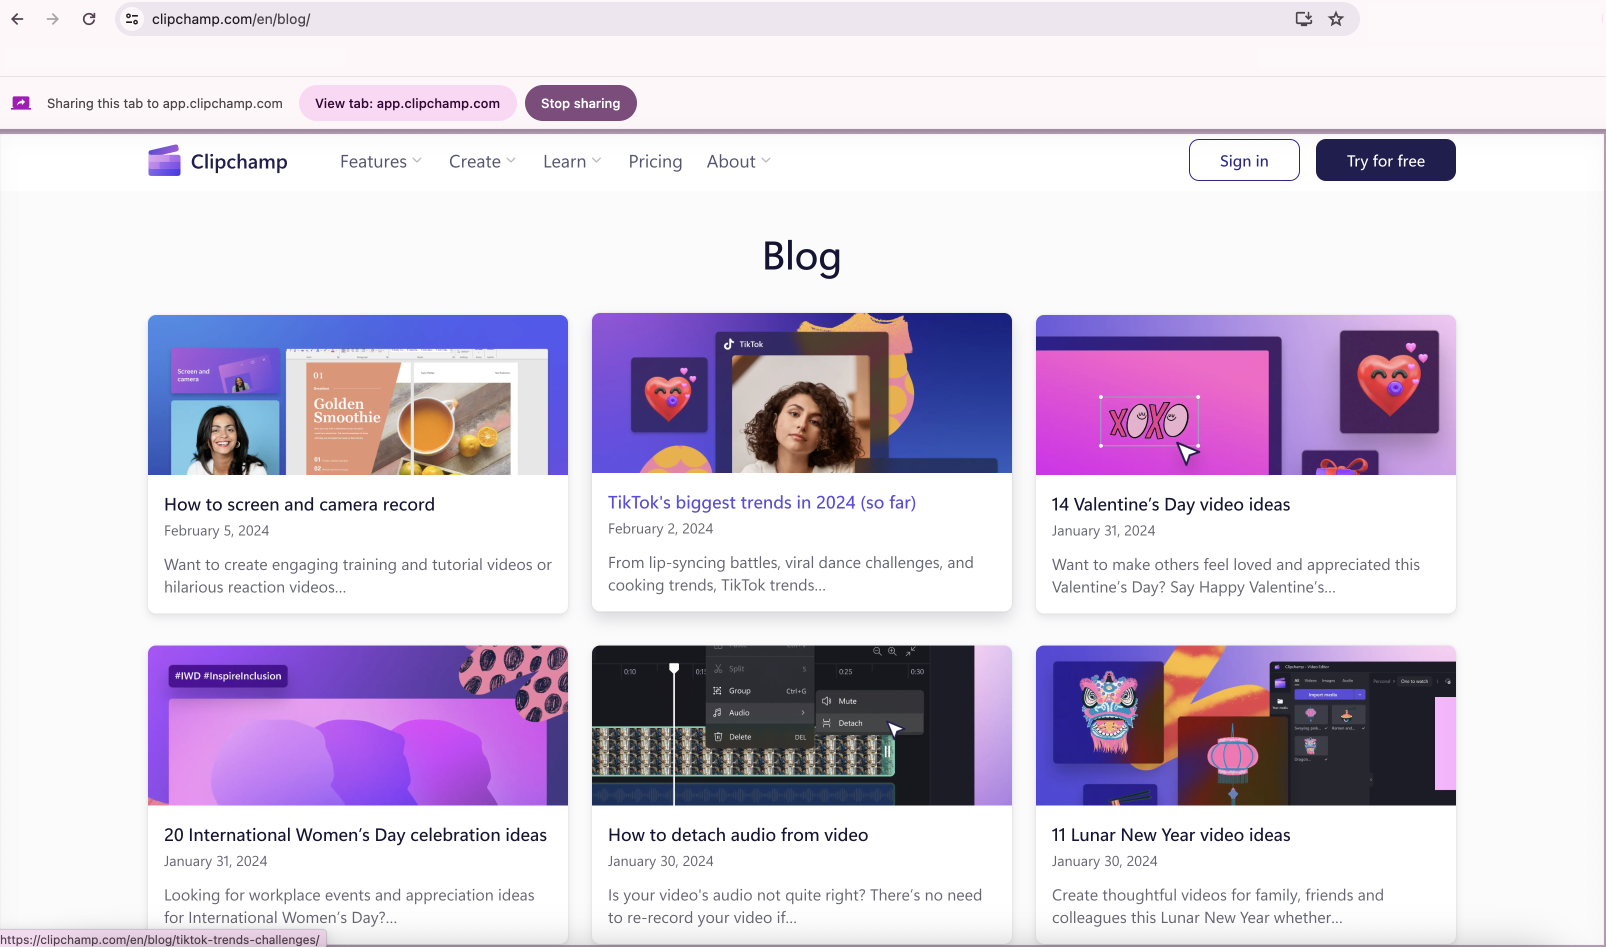
Once you are happy with your screen recording tutorial, click on stop sharing button.
Note: If you would like to record for longer than the maximum time (shown to the right of the elapsed time), try taking several shorter recordings and combining them in the editor later.
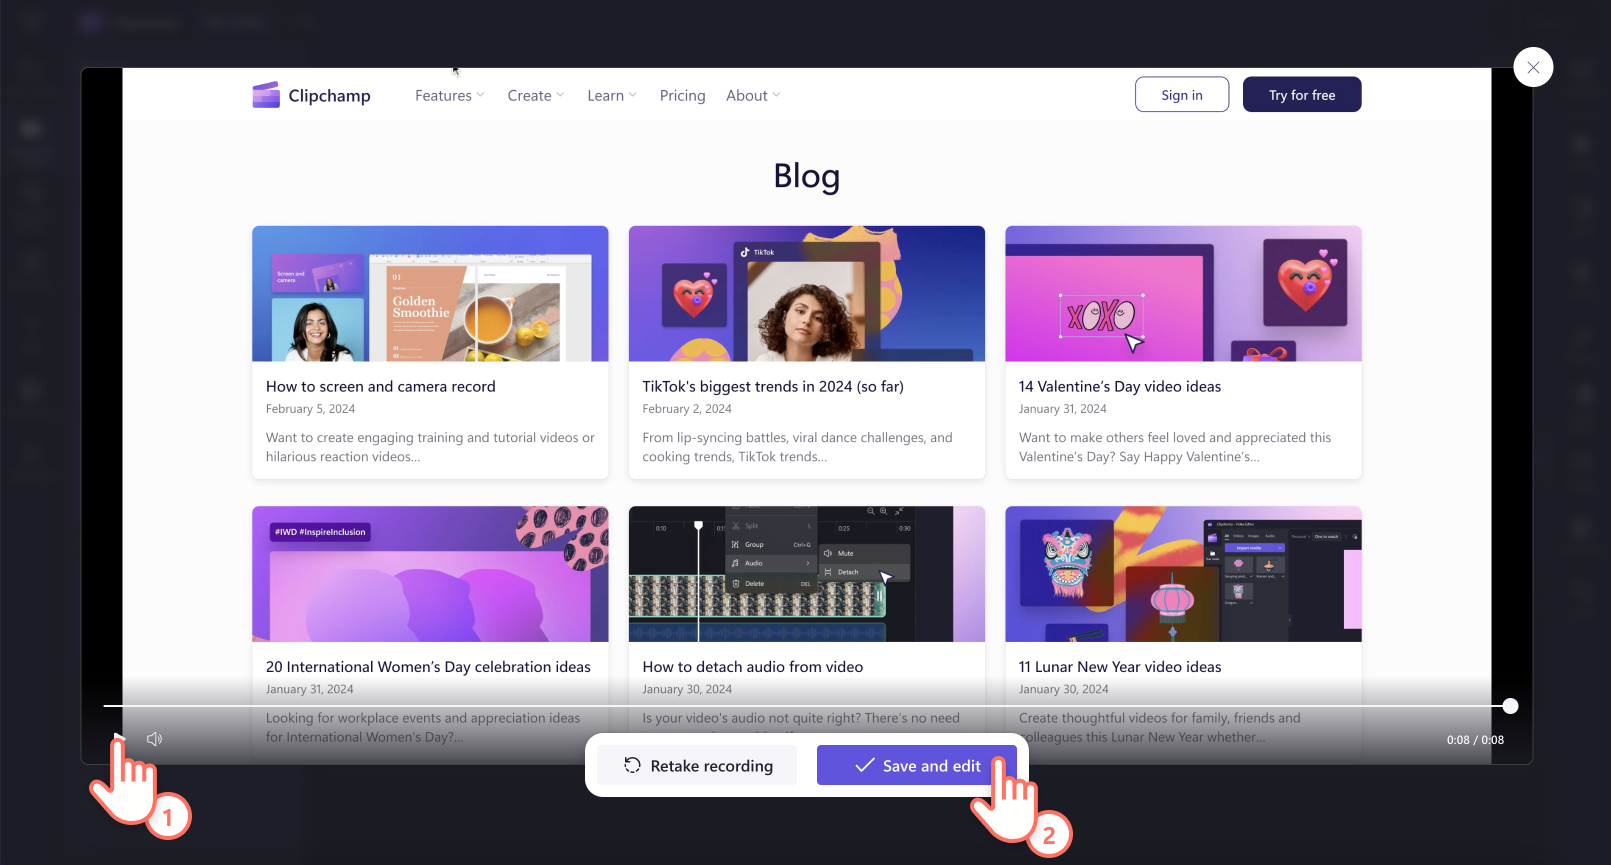
To preview your screen recording with audio, click on the play button. Make sure the audio button isn't on mute so you can hear your audio recording as well. Click on the retake recording button if you would like to redo your video, or click save and edit to return back to the editor.
A copy of the recording (in WebM format) will download to your computer, depending on the default settings in place, you can either select a folder to save it in or it will get stored in the Downloads folder automatically.
Edit your screen recording audio
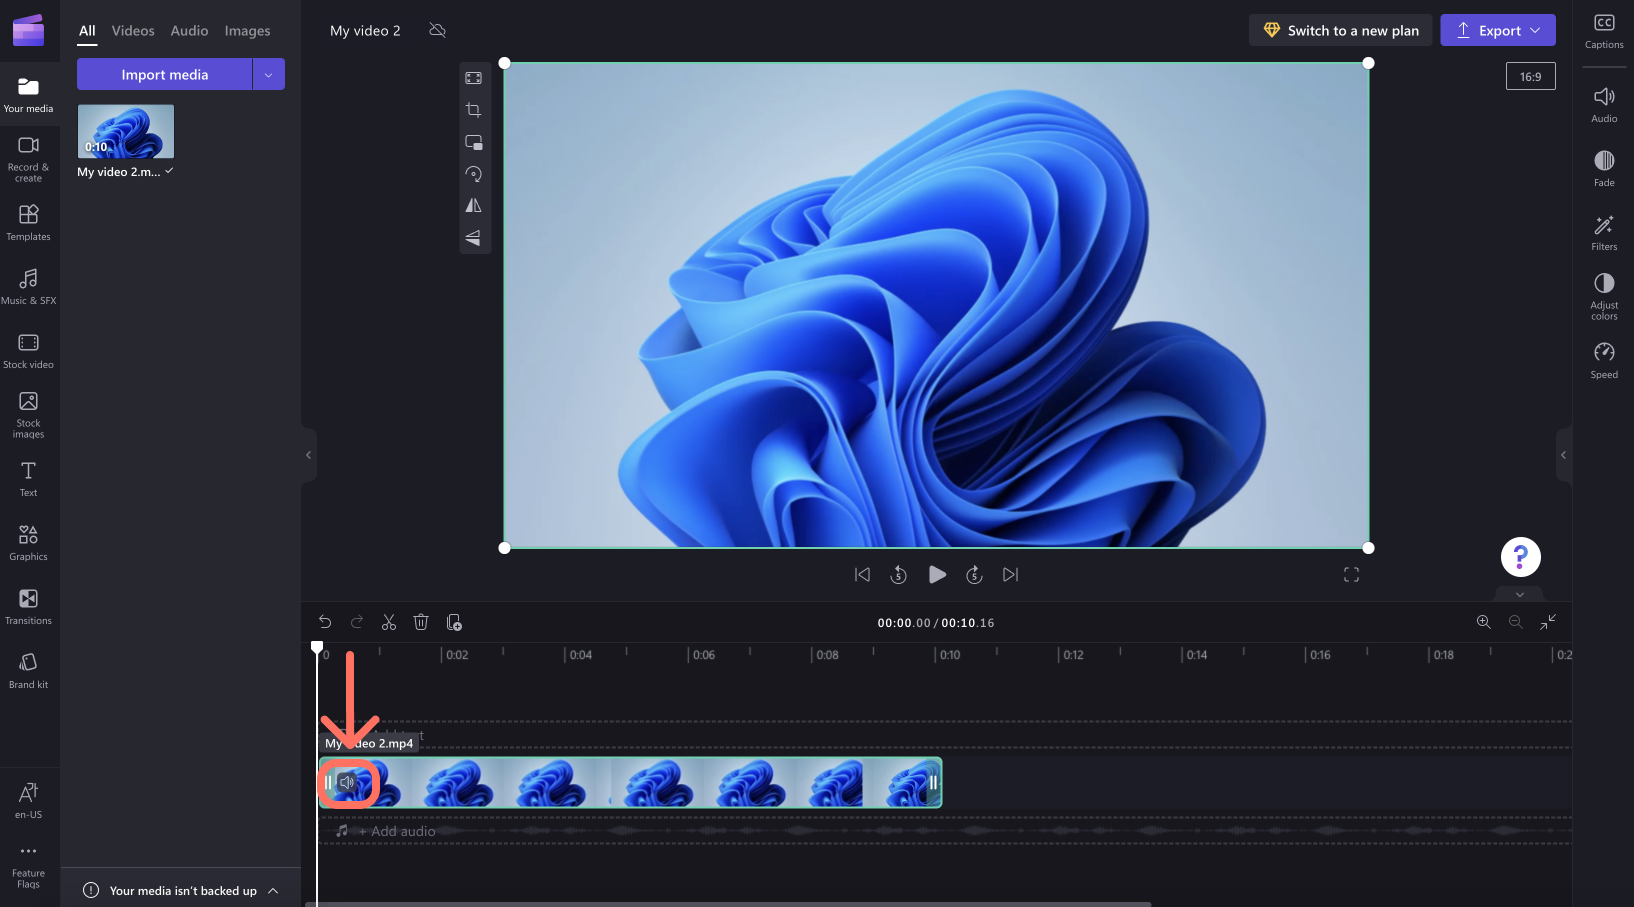
You can mute your screen recording audio by clicking on the microphone icon on the clip on the timeline. You can also detach the audio track to edit it separately.
In addition, you can edit the video further, for instance by trimming unwanted parts off the start or end or splitting it to cut out segments.
If the recording doesn't fit the dimensions of your project (e.g. you see black bars on either side of it) you can crop it to fit the project's aspect ratio.
For more information on Clipchamp's editing tools, see the How to edit a video article.
Export your screen recording video
If you're finished editing and would like to save the screen recording including edits as an MP4 video to your computer, select the export button in the top right and follow the prompts.
In Clipchamp for work accounts, to take a screen recording, go to the record & createtab on the toolbar. There, you can choose between the screen and camera option, the webcam option, or and the screen option.
Selecting screen and camera will record your screen and also turn on your webcam. Selecting screen will keep your webcam turned off and only record your screen. Selecting webcam will turn on your computer's camera and keep the screen recording option disabled.
By default, audio will also be recorded through your computer's microphone. For example, you could talk while showing your screen, but you can also turn audio recording off.
Another option is to only record an audio track while keeping webcam and screen recording off. You can adjust these settings in a later step in the recording interface.
Our example steps below show how to record both screen and camera together and how to turn off the webcam in a later step after you initially selected the screen and camera recording option.
To begin, open the "Record & create" tab
Select record & create on the toolbar, then select screen and camera.
Allow camera & microphone access, start the recording
Important: When you use Clipchamp in Edge, you can select browser tabs from Microsoft Edge to record. To record a Chrome tab, open Clipchamp in Chrome and start a screen recording there.
When you start a recording for the first time, you'll see a popup next to the browser address bar asking for permission to access your camera and microphone.
Allow access, otherwise the screen and camera recording won't work.
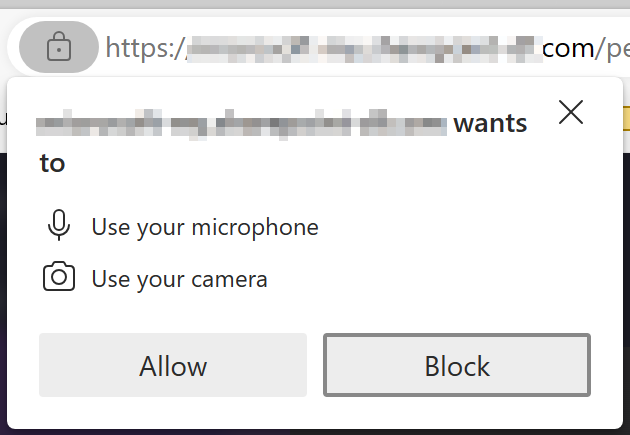
To check the permissions you've given Clipchamp, select the Lock icon and make sure you’ve allowed Clipchamp access to use your webcam and microphone.
In the popup window, toggle your webcam on or off to either include or exclude the camera from the recording session, then click Select a screen to record.
Select a screen, window or browser tab, also decide if you'd like to include the system audio, then select Share.
You will be brought to the screen, window or browser tab you selected to record. After a countdown of beeps, your screen starts actively recording. The computer's microphone will pick up on your voice, computer sounds or mouse clicking, and any noise around you.
To stop recording your screen, select stop sharing in the horizontal toolbar that appeared when the recording started.
TIP: If you want to record for longer than the maximum time, try taking several shorter recordings and combining them in the editor later.
Save your screen recording
After you’ve selected stop sharing, return to the editor. You can now preview your screen recording with audio. If you’re unhappy with the screen-recorded video, select retake recording. If you want to use your video, select save and edit.
Note: If you recorded both screen and camera, there will be 2 files available, one for the screen recording and one for the webcam recording. If you only recorded your screen, there will be one file.
A copy of the recording (in WebM format) will download to your computer, depending on the default settings in place, you can either select a folder to save it in or it will get stored in the Downloads folder automatically.
The clip(s) will also get loaded into the editing project and will automatically be added to the timeline. The audio track of the recording is part of the video.
If there is a screen recording and a camera recording, the 2 files are added to the timeline as a group. You can ungroup them by right clicking on the media on the timeline, then selecting ungroup.
Edit the recording and audio
You can mute your screen recording audio by clicking on the microphone icon on the clip on the timeline. You can also detach the audio track to edit it separately.
In addition, you can edit the video further, for instance by trimming unwanted parts off the start or end or splitting it to cut out segments.
If the recording doesn't fit the dimensions of your project (e.g. you see black bars on either side of it) you can crop it to fit the project's aspect ratio. You can also add text and titles.
For more information on Clipchamp's editing tools, see the How to edit a video article.
Adjust the layout
If your recording includes a webcam clip that appears as a separate item on the timeline, you can edit the layout of the video by freely moving your webcam recording around the screen. To do so, drag and drop the camera clip around the preview window in the editor.
You can also use the editing features on the media's property panel. These include fit, crop, picture-in-picture, rotate, flip horizontal, and flip vertical.
Export your video
If you're finished editing and would like to save the edited project to your computer as an MP4 video, select the export button in the top right and follow the prompts.


